You installed Claude Code. You heard it has plugins. You typed /plugin and either got an error, stared at an unfamiliar interface, or found three conflicting guides that each described something slightly different.
That confusion is completely normal. The plugin system is powerful, but the documentation is scattered across release notes, GitHub issues, and forum posts. This guide pulls it all together.
Here’s exactly what I’ll cover: all 5 ways to install plugins, how to add custom marketplaces, how to keep plugins updated, and how to fix the most common errors. By the end you’ll know which method to use for your situation — whether you’re an individual developer or setting up automation for a team.
Prerequisites: Check Your Version First
The plugin system is a public beta feature that requires a recent version of Claude Code. If /plugin doesn’t work, you likely need to update.
Check your version:
claude --versionIf the plugin commands aren’t recognized, update to the latest:
npm update -g @anthropic-ai/claude-codeVerify the update took effect:
claude --versionNote: The plugin system is still in beta. Commands and behavior described in this guide may change as the feature matures. I’ll keep this post updated.
Once you’re on a version that supports plugins, you have 5 ways to install them. Here’s when to use each one.
Method 1: The Plugin TUI — Browse and Install Visually
The most beginner-friendly approach. Open a Claude Code session and type:
/pluginThis opens a full terminal UI with 4 tabs:
- Discover — browse available plugins from all registered marketplaces
- Installed — see what’s currently active and manage it
- Marketplaces — add, remove, or update marketplace sources
- Errors — see what broke and why
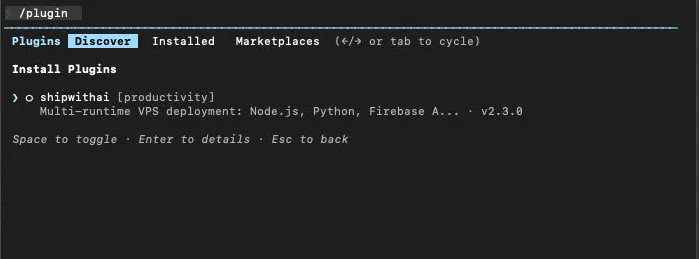 The Discover tab lists plugins from all registered marketplaces. Use arrow keys to navigate, Enter to see details.
Navigate with arrow keys. When you select a plugin, you’ll see its description, version, and source marketplace. Press Enter to install.
Before installation completes, you’ll be asked to choose a scope:
- User — installed for your account, available in all projects (
~/.claude/settings.json) - Project — installed for this project only (
.claude/settings.jsonin project root, commit this to share with your team) - Local — installed for this project, but not committed to git (
.claude/settings.local.json)
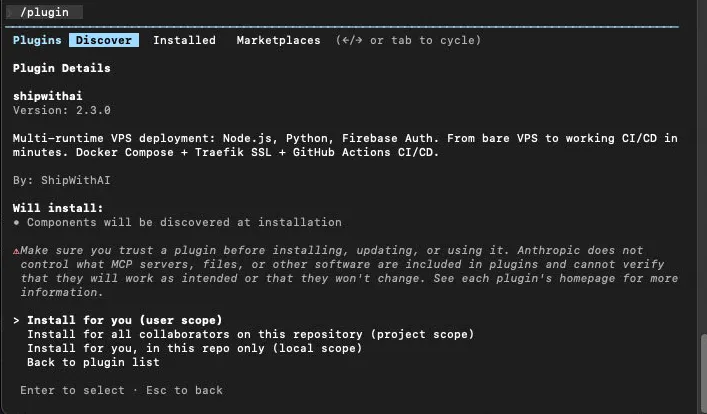 Plugin details page with scope selection. User scope = personal, Project scope = shared with team, Local scope = this repo only.
After installing, switch to the Installed tab to confirm everything loaded correctly.
 After installation, the plugin’s skills appear in your session. Here the shipwithai plugin adds
 /shipwithai:deploy.
Best for: Exploring what’s available, installing your first few plugins, visual confirmation that something worked.
Method 2: Quick Install — In-Session Command
Already know the plugin name? Skip the TUI and install directly:
/plugin install formatter@claude-plugins-officialThe format is plugin-name@marketplace-name. claude-plugins-official is the official Anthropic marketplace, pre-registered by default.
To specify scope at install time:
/plugin install formatter@claude-plugins-official --scope project/plugin install linter@claude-plugins-official --scope user/plugin install debug-helper@claude-plugins-official --scope localIf you omit --scope, Claude Code will prompt you to choose interactively.
Best for: When you already know the exact plugin name, quick one-off installs during a session.
Method 3: CLI Install — Outside a Session
Need to install plugins from a script, a CI pipeline, or just prefer the terminal? Use the claude plugin subcommand outside of any session:
# Install with explicit scopeclaude plugin install formatter@claude-plugins-official --scope project
# Install to user scope (available everywhere)claude plugin install my-tool@claude-plugins-official --scope user
# Install without starting an interactive sessionclaude plugin install linter@claude-plugins-official --scope local
You can also uninstall via CLI:
claude plugin uninstall formatter@claude-plugins-official --scope projectNote: As of now, the non-interactive CLI supports
installanduninstall. For listing, updating, enabling, or disabling plugins, use the/pluginTUI inside a session (see Method 1).
Best for: CI/CD automation, team setup scripts (npm run setup that pre-installs required plugins), Dockerfile setup steps.
Method 4: Install from a GitHub Repo (Custom Marketplace)
The official marketplace covers the basics, but the real power comes from community and private plugins hosted on GitHub. Here’s how to add one.
Step 1: Register the marketplace
Inside a Claude Code session:
/plugin marketplace add anthropics/claude-codeThe format is owner/repo. Claude Code fetches the marketplace manifest from that GitHub repository.
GitLab and Bitbucket work too:
/plugin marketplace add https://gitlab.com/myorg/claude-plugins/plugin marketplace add git@github.com:myorg/private-plugins.gitYou can also register a local directory as a marketplace (useful for internal team plugins):
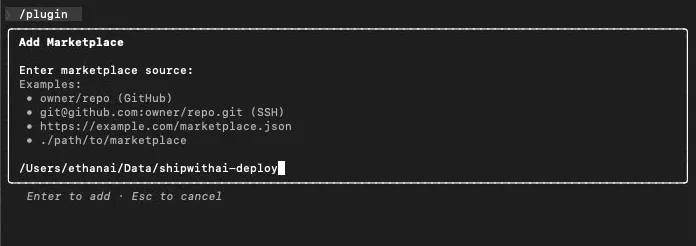
/plugin marketplace add /Users/you/work/our-internal-plugins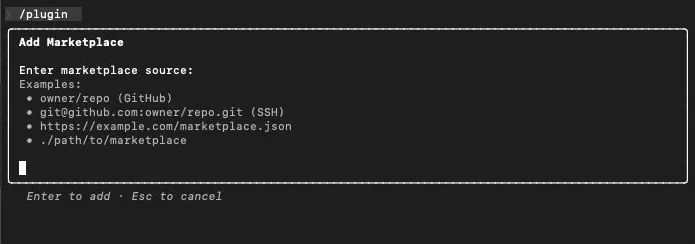 The Add Marketplace dialog supports GitHub repos, SSH URLs, HTTPS URLs, and local paths.
After adding a marketplace, it appears in the Marketplaces tab:
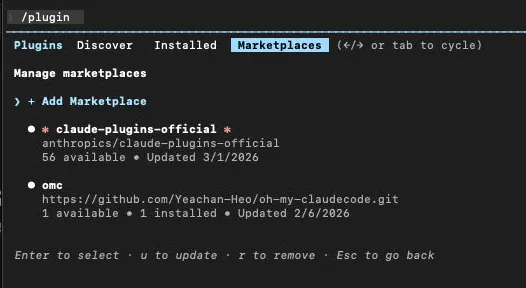 Two marketplaces registered: the official Anthropic marketplace (56 plugins) and a custom one. Press
 u to update, r to remove.
Step 2: Install from it
Once the marketplace is registered, install plugins from it the same way as before:
/plugin install some-tool@anthropics/claude-codeOr use the TUI — the new marketplace’s plugins will appear in the Discover tab automatically.
Updating a marketplace (to pull in newly published plugins):
/plugin marketplace update anthropics/claude-codeBest for: Community plugins, internal team plugin registries, plugins not yet in the official marketplace.
Method 5: Local Plugin Directory — Development and Testing
If you’re building a plugin, or want to load a plugin that isn’t published anywhere, point Claude Code at a local directory:
claude --plugin-dir ./my-pluginFor multiple local plugins at once, repeat the flag:
claude --plugin-dir ./formatter-plugin --plugin-dir ./linter-pluginYou can also register a local directory as a marketplace via the TUI (instead of --plugin-dir):
 Typing a local path directly in the Add Marketplace dialog. This registers the directory as a marketplace source.
Plugin directory structure:
The most common mistake here is putting everything inside a .claude-plugin/ subdirectory. Don’t do that. Commands, agents, and skills go at the plugin root, not nested:
my-plugin/├── .claude-plugin/│ └── manifest.json ← Plugin metadata goes here├── commands/ ← Commands go HERE (plugin root), not inside .claude-plugin/│ └── my-command.md├── agents/ ← Same for agents│ └── my-agent.md└── skills/ ← And skills └── my-skill.mdBest for: Plugin development, testing unpublished plugins, one-off private tools you don’t want to publish.
Updating Plugins
Auto-updates are configured per marketplace, not per plugin. For the official Anthropic marketplace, auto-update is enabled by default. For third-party and local marketplaces, it’s disabled by default.
To toggle auto-update for a marketplace, open the TUI:
/pluginGo to the Marketplaces tab, select a marketplace, and toggle “Enable auto-update” or “Disable auto-update.”
To manually refresh a marketplace (pull in newly published plugins):
/plugin marketplace update marketplace-nameEnvironment variables for controlling updates:
# Disable ALL auto-updates (Claude Code itself + plugins)DISABLE_AUTOUPDATER=true claude
# Keep plugin auto-updates ON while disabling Claude Code auto-updatesDISABLE_AUTOUPDATER=true FORCE_AUTOUPDATE_PLUGINS=true claude
Note: There is no
claude plugin updateCLI command yet. Plugin updates happen automatically via marketplace auto-update, or manually by refreshing the marketplace via the/pluginTUI. Non-interactive CLI update commands are a requested feature but not yet implemented.
Managing Installed Plugins
Day-to-day plugin management happens inside a Claude Code session via the /plugin TUI:
/pluginFrom the Installed tab, you can:
- Enable / Disable a plugin without uninstalling it
- Uninstall a plugin completely
- View details like version, source marketplace, and scope
You can also manage plugins using slash commands inside a session:
/plugin enable plugin-name@marketplace/plugin disable plugin-name@marketplace/plugin uninstall plugin-name@marketplaceOr uninstall via CLI (outside a session):
claude plugin uninstall plugin-name@marketplace --scope projectDirect settings.json editing is another option. For project-scoped plugins, edit .claude/settings.json in your project root. This is especially useful for team automation — commit this file to your repo and every team member gets the same plugins when they open the project.
Troubleshooting
| Symptom | Likely Cause | Fix |
|---|---|---|
/plugin not recognized | Claude Code version too old | npm update -g @anthropic-ai/claude-code |
| Plugin shows in Installed but doesn’t work | LSP binary missing | Install the required language server (check plugin docs) |
| Plugin loads but commands aren’t available | Wrong directory structure | Move commands/, agents/, skills/ to plugin root, not inside .claude-plugin/ |
| Installed plugin not appearing | Stale cache | Restart session; if persists, reinstall the plugin |
| Marketplace add fails | Repo format wrong | Use owner/repo for GitHub, full URL for GitLab/Bitbucket |
| Plugin update not taking effect | Marketplace not refreshed | /plugin → Marketplaces → select → refresh |
claude plugin install not found | Old CLI version | npm update -g @anthropic-ai/claude-code |
| Plugin installs but errors tab shows issues | Manifest errors | Check .claude-plugin/manifest.json for missing required fields |
Cheat Sheet
| What you want | Command | Where |
|---|---|---|
| Browse & manage plugins | /plugin | In session |
| Install a plugin | /plugin install name@marketplace | In session |
| Install with scope | /plugin install name@marketplace --scope project | In session |
| Install via CLI | claude plugin install name@marketplace --scope user | Terminal |
| Uninstall via CLI | claude plugin uninstall name@marketplace --scope project | Terminal |
| Enable plugin | /plugin enable name@marketplace | In session |
| Disable plugin | /plugin disable name@marketplace | In session |
| Uninstall plugin | /plugin uninstall name@marketplace | In session |
| Add marketplace | /plugin marketplace add owner/repo | In session |
| Refresh marketplace | /plugin marketplace update marketplace-name | In session |
| Load local plugin | claude --plugin-dir ./path/to/plugin | Terminal |
| Disable all auto-updates | DISABLE_AUTOUPDATER=true claude | Terminal |
| Keep plugin updates only | DISABLE_AUTOUPDATER=true FORCE_AUTOUPDATE_PLUGINS=true claude | Terminal |
What’s Next
Now that you know how to install plugins, the next question is: what plugins should you actually install?
The official marketplace (claude-plugins-official) is the safest starting point — every plugin there has been reviewed by Anthropic. For community plugins, check the plugin’s GitHub repo for activity, stars, and open issues before installing.
And if you can’t find a plugin that does what you need — build one. It’s more approachable than it sounds. A plugin is just a directory with a manifest and some Markdown files for commands or agents.
Coming up: a step-by-step guide to building your first Claude Code plugin from scratch.